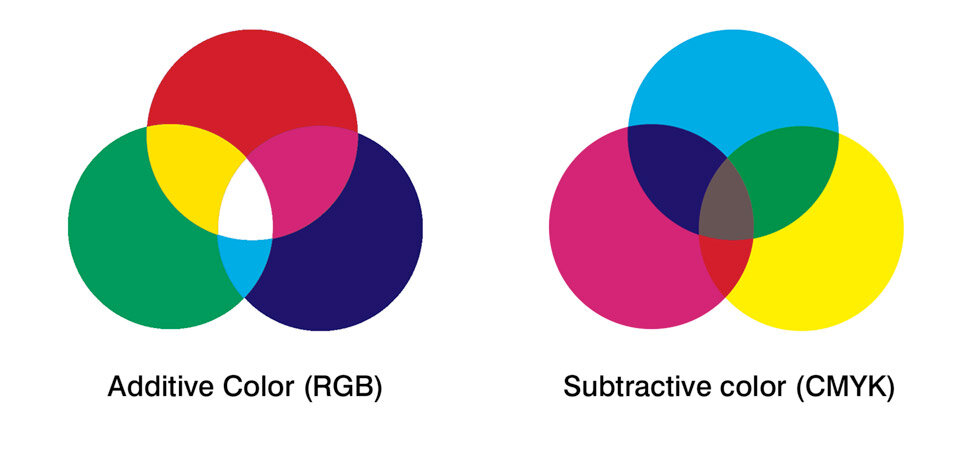
Colour values are primarily referenced in either RGB (Additive) or CMYK (subtractive) values. If we are working on a computer, colour is represented on a screen with light. These values are created using the additive colour method. This process begins with mixing values of black and ends with white, as colour is added the values the result becomes lighter.
When you are mixing colours with paint or through a printing process, colours are created using the subtractive colour method. This process begins mixing values of white and ends with black, as colour is added the values the result becomes darker. At the end of the day, you have to first have to understand the properties of Colour; how this can be effected by saturation and brightness.
Below is a cheat sheet of how you can effect saturation and brightness using a selective colour adjustment layer.
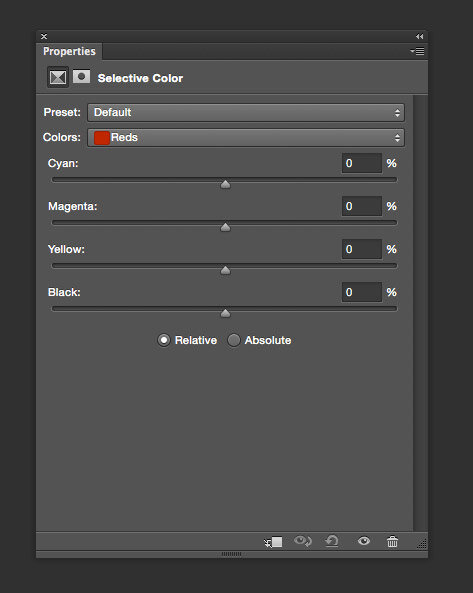
Properties of Red
More Saturation
Simply increase the Magenta and Yellow values in equal proportions.
Less Saturation
Simply decrease the Magenta and Yellow values in equal proportions.
Lighter Colour
Simply decrease the Cyan value
Darker Colour
Simply increase the Cyan value
Properties of Yellow
More Saturation
Simply increase the Yellow value
Less Saturation
Simply decrease the Yellow value
Lighter Colour
Simply decrease the Cyan and Magenta values in equal proportions.
Darker Colour
Simply increase the Cyan and Magenta values in equal proportions.
Properties of Green
More Saturation
Simply increase the Cyan and Yellow values in equal proportions.
Less Saturation
Simply decrease the Cyan and Yellow values in equal proportions.
Lighter Colour
Simply decrease the Magenta value
Darker Colour
Simply increase the Magenta value
Properties of Cyan
More Saturation
Simply increase the Cyan value
Less Saturation
Simply decrease the Cyan value
Lighter Colour
Simply decrease the Magenta and Yellow values in equal proportions.
Darker Colour
Simply increase the Magenta and Yellow values in equal proportions.
Properties of Blue
More Saturation
Simply increase the Cyan and Magenta values in equal proportions.
Less Saturation
Simply decrease the Cyan and Magenta values in equal proportions.
Lighter Colour
Simply decrease the Yellow value
Darker Colour
Simply increase the Yellow value
Properties of Magenta
More Saturation
Simply increase the Magenta value
Less Saturation
Simply decrease the Magenta value
Lighter Colour
Simply decrease the Cyan and Yellow values in equal proportions.
Darker Colour
Simply increase the Cyan and Yellow values in equal proportions.