
OVERVIEW:
A typical issue that photographers face when capturing digital images is limited dynamic range of DSLR cameras. We always have to choose between which detail we would like to keep, and which detail will unfortunately be lost. If you choose to expose for the highlights – the shadow detail may be compromised. Likewise, if you choose to expose for the shadows – the highlights may get overexposed and you’ll end up capturing no detail in the brightest parts of the image.
This is a quick tip that will show you how you can enhance and retain the light and dark information within an image.
Typically this is used for landscape photography, however can be applied to any type of image. This technique enables you to adjust the contrast of the scene to try and reflect your initial vision, to show “why” you decided to capture this image in the first place.
Feel free to download and view the PSD file of the photo above:
From Dropbox
From Google Drive
HOW DO YOU USE APPLY IMAGE?
Follow these steps to add contrast and drama to your image:
1. Duplicate your background layer: press Ctrl + J or Command + J on a Mac.
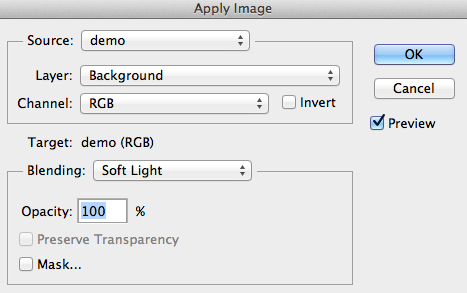
2. Select “Apply Image…” from the Image menu:

Now depending on the image at hand you will have a few adjustment options.
HOW TO CLOSE DOWN HIGHLIGHT DETAIL:
With this particular adjustment, you are darkening the image, specifically targeting the highlight detail within the image.
Change the blending mode in the Apply Image dialogue box to Multiply.

HOW TO OPEN UP SHADOW DETAIL:
With this adjustment, you are lightening the image, targeting the shadows in the image.
Change the blending mode in the Apply Image dialogue box to Screen.

HOW TO ADD CONTRAST:
With this adjustment, you are darkening the shadows and brightening the highlights, in other words, adding contrast. Change the blending mode of the Apply Image dialogue box to Overlay or Soft Light, depending on how much contrast you wish to introduce.
QUICK TIP:
All of these adjustments can be refined using Blend If slider. If you are unfamiliar with Blend If you should check out my Photoshop 101: How to use Blend If Article
You can apply each or some of these adjustments as separate layers and then selectively mask out the areas where you wish those specific effects to be shown. For example, for the image above, I used two Apply Image layers for the highlights and one for contrast. This is a simple, yet very effective way to adjust either the contrast or specifically target the shadow or highlight information.